
This post offers some guidelines on the design and printing of academic conference posters for Holy Cross students, staff, and faculty. While it focuses on the use of Microsoft PowerPoint to create posters, it is not a general treatise on how to use PowerPoint. For that, see the PowerPoint Help Center. Here we offer a few tips on how to tweak PowerPoint for optimal poster printing. The examples are shown as they appear on the Mac, but users running PowerPoint under Windows should find similar functionality. We also briefly discuss the use of LibreOffice Impress and Google Slides in poster design.
All poster printing at Holy Cross is done by the Graphic Arts Department in the basement of Fenwick Hall. You can email your poster printing request to graphicarts@holycross.edu, along with a PDF file of your poster. Payment is arranged when you pick up the printed poster. Contact Graphic Arts for details on printing costs and scheduling of printing.
Also, check out Colin Purrington’s excellent website Designing conference posters, in particular his examples of good, bad, and creative posters. He also has poster templates (PowerPoint files pre-formatted as posters in various styles) available for free download.
Setting up PowerPoint
Microsoft PowerPoint was not designed for creating posters; it was designed for on-screen presentations, made up of multiple slides. (It’s what we now use instead of these things.) Nevertheless, because of its wide availability PowerPoint is often used to create posters, and does a good job as long as it is set up properly. Most of the features available in PowerPoint, such as animations, sound, hyperlinks, and whatnot are for presentations and are thus irrelevant for poster design. Here we discuss only the relatively small subset of PowerPoint features that are useful in designing posters.
To use PowerPoint to design a poster, the PowerPoint file should contain just one, giant slide, the dimensions of which are set to be the actual dimensions of the poster when printed. Setting the correct slide dimensions is the single most important factor in designing a successful poster. You then compose your poster on the slide, and eventually export it to PDF format for final printing. PDF is the preferred format for printing because it encapsulates all text, graphics, and fonts into a single file, making it easier to transfer the file from your computer to the computer used for final printing by Graphic Arts.
When you start PowerPoint it usually assumes that you want an initial slide set up with a title and subtitle. But for a poster it’s best to use a completely blank slide layout. To do this, first click on the slide to select it. Then, from the Home ribbon, under the Slides section, click on Layout, then choose Blank.
By default, the page size of a PowerPoint slide is 7.5 by 10 inches, which is optimal for an on-screen presentation, but not good for a poster. You can change this via the Page Setup dialog, from the Design menu:
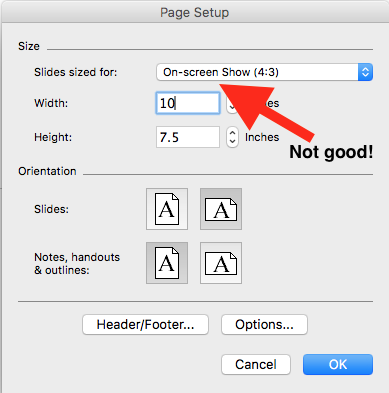
If you design your poster using the default page size of 7.5 by 10 inches, your poster may not print properly. It is therefore critical that you set the page size to be that of the final poster when printed.
To do this, in the Page Setup dialog, choose a “Custom” slide size and then set the dimensions of the slide to match those of your poster:
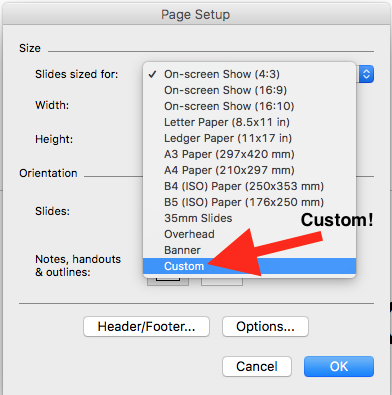
Using a 36 by 48-inch poster as an example, the slide’s width should be set to 48 inches and its height set to 36 inches. Also, be sure that the Orientation is set to landscape:

Posters are printed from a large roll of paper. Common roll paper widths (which PowerPoint calls “height”) are 36, 40, or 44 inches. It’s best to design your poster to match one of the standard roll paper widths to avoid alignment problems and waste of paper. PowerPoint won’t let you use a custom page size that is larger than 56 inches. Typical poster sizes thus are 36 x 48, 36 x 56, 44 x 56, et cetera. If you use poster dimensions smaller than the standard roll paper widths, you will probably have to do some manual trimming of the final poster. Also, conference poster sessions often have size limits, so be sure to check before designing your poster. It’s also a good idea to check with Graphic Arts on the current availability of the various paper sizes.
Designing the Poster
A note on background colors: In PowerPoint you can change the background color of your entire poster by right-clicking on a blank area of the poster canvas and choosing Format Background.... This will allow you to choose solid colors, gradient colors, patterns, or images as the background of your poster. However, use caution. Dark or patterned backgrounds can make the poster hard to read. (See this example.) It’s often better to use a simple white background, and it saves ink as well. It’s also a good idea to never give graphs a colored background, which is distracting and detracts from the visualization of the data. See Colin Purrington’s poster design website for more design suggestions.
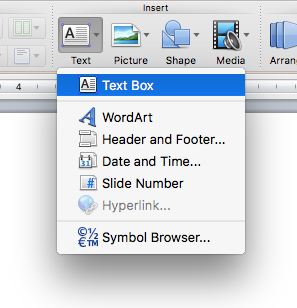
Once you have set up your paper size and orientation, it’s a matter of adding titles, text, and graphics and arranging those objects on the poster canvas. Most of the PowerPoint tools that you will need for this are on the Home and Insert ribbons. For a poster, the two most common tools will be Insert Text and Insert Picture.
You can’t type text directly on your poster canvas. Any text, be it the title of the poster, section headings, narrative paragraphs, etc., needs to be in a Text Box:
When you select Insert Text Box and then click your mouse cursor anywhere on the canvas, a Text Box will be created at that point. You can then begin typing or pasting text, and the Text Box will expand as needed:

The little circles and squares along the dotted border of the Text Box are “handles” that can be used to adjust the box’s size. The colored circle connected to the top of the Text Box can be used to rotate the text. The text inside of the Text Box can be edited and formatted using common word processing tools found in the Home ribbon. You can click and drag on the box’s border to move the Text Box around on the canvas.
If you click on the Text Box to select it, and then right-click on the border of the box, a pop-up menu will appear:

The Format Text option gives you a dialog box with a series of tools for modifying the appearance of the text inside the Text Box. This includes such things as the font, font size, and font color. The Format Shape option lets you modify aspects of the text box itself, such as the background color, border style, and border color. Select Edit Text to begin typing or pasting text into the Text Box.
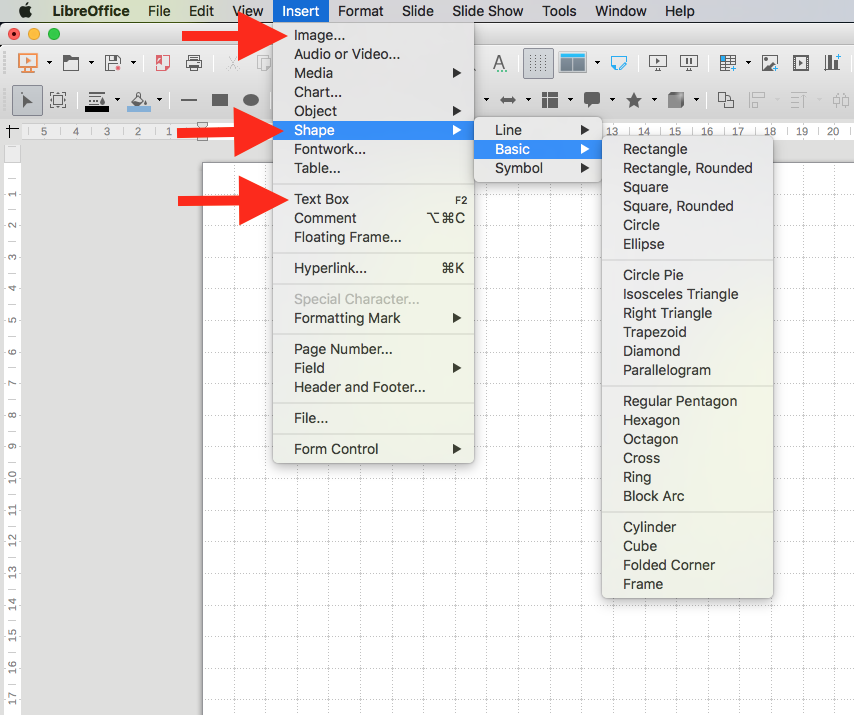
Instead of a plain rectangular text box, you can insert a shape and place formatted text inside of it. For example, to insert a Rounded Rectangle shape, click on the Insert Shape button, hover your mouse cursor over Rectangles, then click on the Rounded Rectangle shape:

You then can click your mouse cursor on your poster canvas at the desired location and drag the rectangle shape out to the size you want. The shape has resizing and rotation handles like the Text Box object, and in fact contains a Text Box that holds the text. Similar to the Text Box, if you select the shape and right-click the shape’s border, a menu will appear giving you options to Edit Text, Format Text, and Format Shape:

When placing text inside of a shape, use the Text Box option of the Format Shape dialog to control how the text fits into the shape, preferably before you start inserting text. Select “Resize text to fit shape" and “Wrap text in shape" to ensure that your text will be automatically resized to fit inside the shape.
To create borders of various styles around blocks of text, insert a shape as just described, then use Format Shape to turn off the background fill color. You will be left with the border of the shape, which you can then modify using the Line option of the Format Shape dialog box.
If, after turning off the shape’s background color, your text has disappeared, it’s probably because the text color was white and you have just turned the background color to white, rendering the text invisible. Go into Format Text... and change the text color to something other than white.
To place images on your poster canvas, use the Insert Picture tool. If you have image files on your computer, you can also simply drag the image file onto the poster canvas. It’s usually best to insert images from files, because then you know the resolution of the image. Be sure your image is of sufficient resolution, in terms of number of pixels, so that it does not appear blurry when the full-size poster is printed. To test this in PowerPoint, zoom your poster out to full size, which is a zoom level of 100%, and check to see that your images are crisp enough. If not, you need higher-resolution images. This is also a good way to check that your text will be readable when printed. Step back four to six feet from your computer monitor when the poster is zoomed to 100%, and this should be a reasonable approximation of what the printed poster will look like to a reader.
When you insert an image onto your poster canvas, it will have the same resizing and rotation handles as the Text Box and shape objects:
You can click and drag the image border to move the image to the desired location on your poster. You can also resize the image by dragging the handles. Note that if you resize the image using one of the corner handles, the aspect ratio will be preserved, but if you drag one of the side handles, you will distort the image. Thus you should as a general rule only resize an image by dragging the corner handles.
Once you have various Text Boxes, shapes, and images on your poster canvas, the Arrange tool can be used to center or align them on the poster and in relation to each other. You have to first select one or more objects on your poster canvas to activate the various tools on the Arrange menu. To select a Text Box, Shape, image, or other object, simply click on it until the border and handles appear. Then, click the Arrange button, then Align or Distribute, and choose whatever alignment you want:
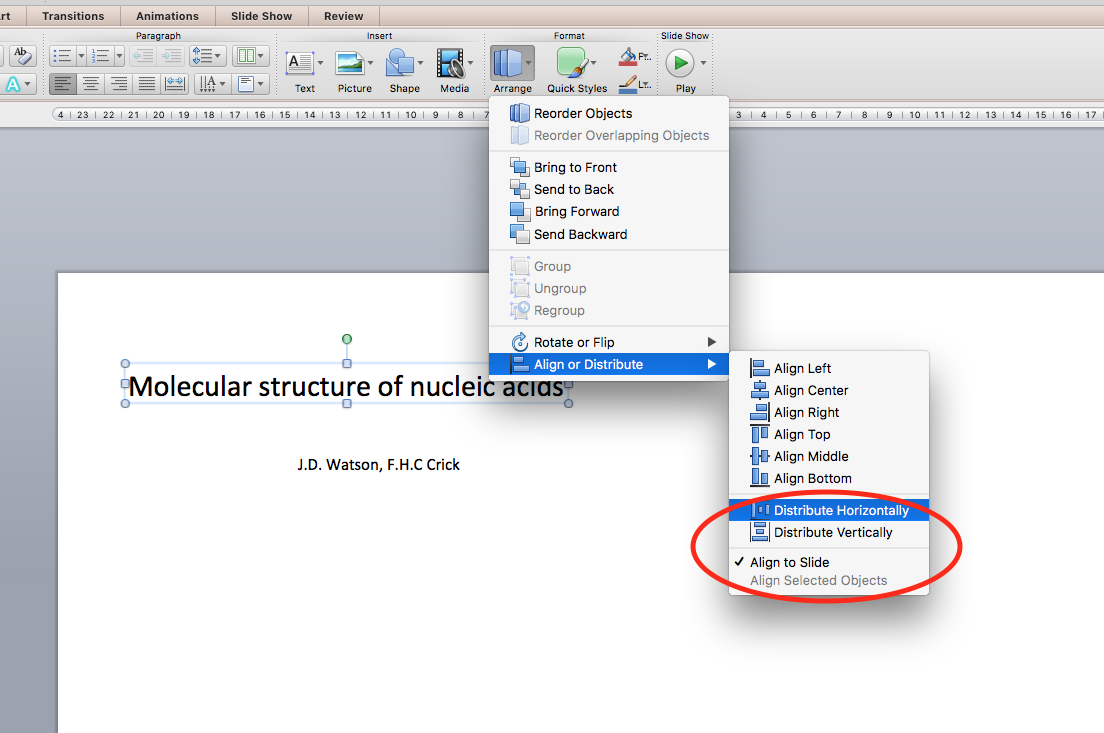
When you have only one object selected, you will only have the option to align it relative to the entire slide (that is, the poster). But when you have selected two or more objects, you can either align them to the slide or to each other (Align Selected Objects). To select multiple objects, click on the first object to select it, then hold down the Shift key while clicking on additional objects. Multiple objects that have been selected will all display their borders and handles. You can then use the Arrange menu to align or distribute the objects as desired.
You can copy and paste any object by first selecting it, and then using either the Edit|Copy and Edit|Paste menu items or the Control-C and Control-V keyboard shortcuts. This is a handy way to quickly produce a series of identical objects, such as several shapes to hold various blocks of text, without having to create each one individually.
Using a Poster Template
The previous instructions are for designing a PowerPoint poster from scratch, but it’s easier to use a poster template. Some Holy Cross academic departments can supply students and faculty with a PowerPoint template for laying out their posters, in which the poster’s dimensions and basic design are already established. You can also download other free poster templates from the internet: just search for “PowerPoint poster templates.” Poster templates are PowerPoint files containing a poster-sized slide that has been set up with an arrangement of titles, text boxes, graphics, etc., in which you place your own material. You can also modify the template to suit your needs.
As previously mentioned, Colin Purrington’s Designing conference posters website has free templates for academic posters, and there are many other sources of poster templates on the web. Regardless of which poster template you end up using, it’s a good idea to check that you can successfully export a PowerPoint template to PDF format before proceeding further with your poster design. It’s also a good idea to upgrade your copy of PowerPoint to the latest version if possible, because we have observed that older versions of PowerPoint may have issues with creating PDF output. There are also other software applications that can be used to design posters, as mentioned below under Other Software.
We will use one of Purrington’s poster templates as an example. Clicking this link will download the template named poster-template-horizontal-1-purrington.ppt. (If you are currently logged into your Google Gmail account, the template might automatically open up in Google Slides instead of downloading. If that happens, right-click the above link, choose Save link as..., and then save the template to your computer’s file system. We will discuss using PowerPoint templates in Google Slides below.)
When you open the downloaded template in PowerPoint, it should look something like this:
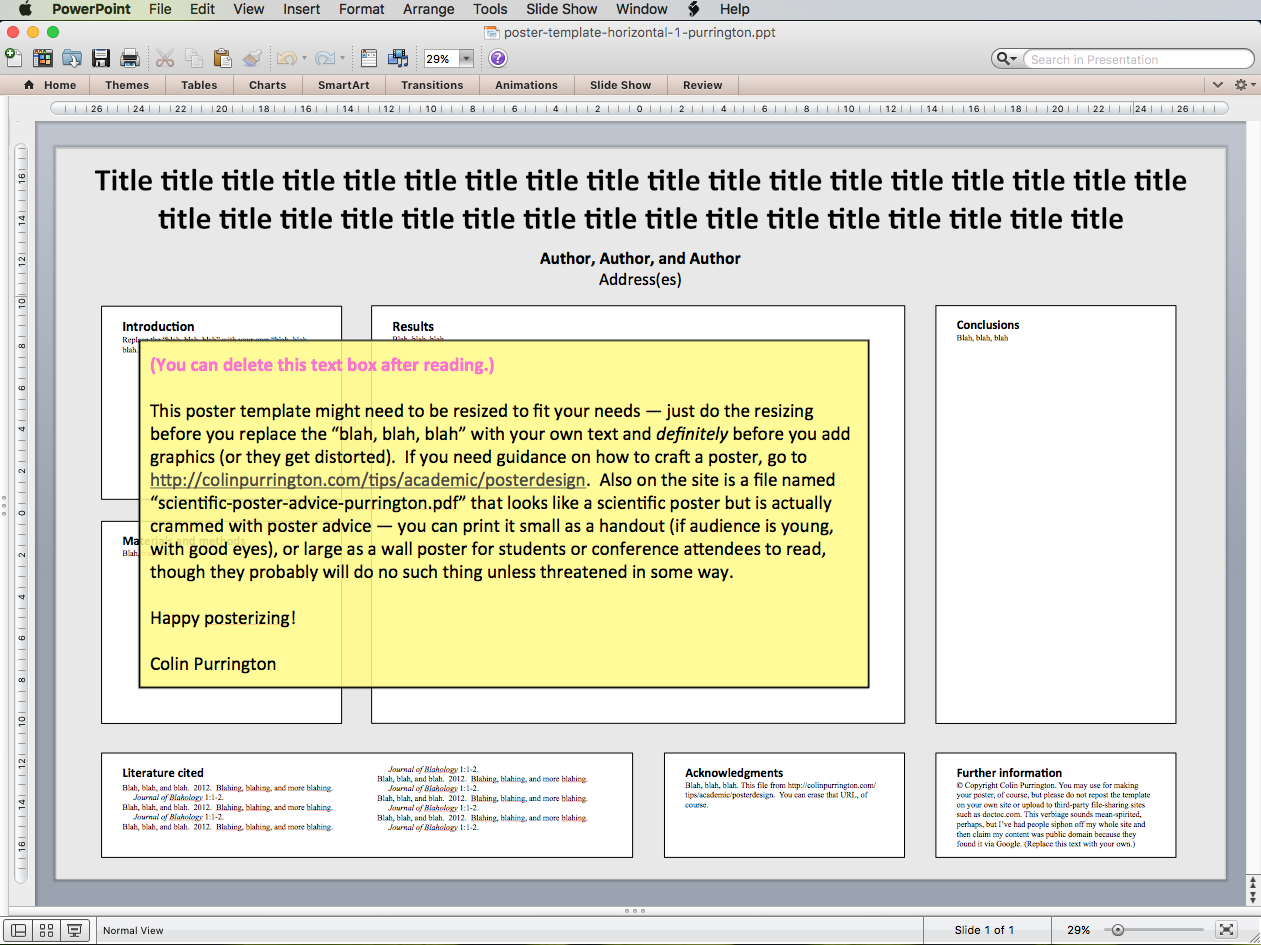
(Click image to enlarge.)
The colored box that says “You can delete this text box after reading” can be deleted (after reading) by selecting it and then hitting the Delete key.
If you click File|Page Setup you will see that the template is designed for a width of 56 inches and a height of 35 inches. If you want to change these dimensions, it’s important to change them before you start adding material, because if you change the dimensions after you have added your own text, images, etc., you run the risk of objects getting distorted, out of alignment, or overlapping. Best practice is to find a poster template with dimensions that match or are close to the dimensions you need.
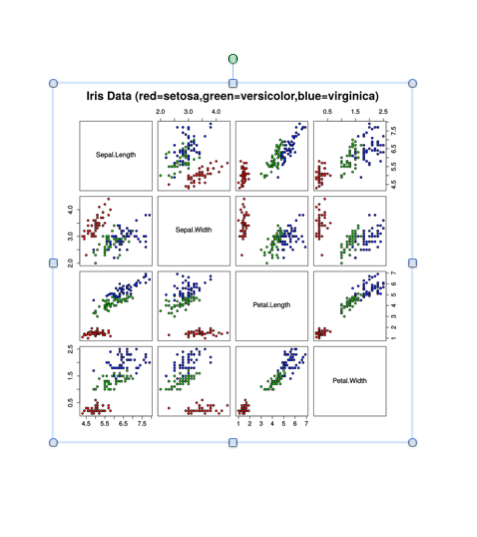
The template behaves just like a PowerPoint poster file that you have designed from scratch, as described above, except that “all” you have to do is delete the placeholder text and replace it with your own text, in addition to any images and statistical graphics that comprise your research.
Creating a PDF File for Printing
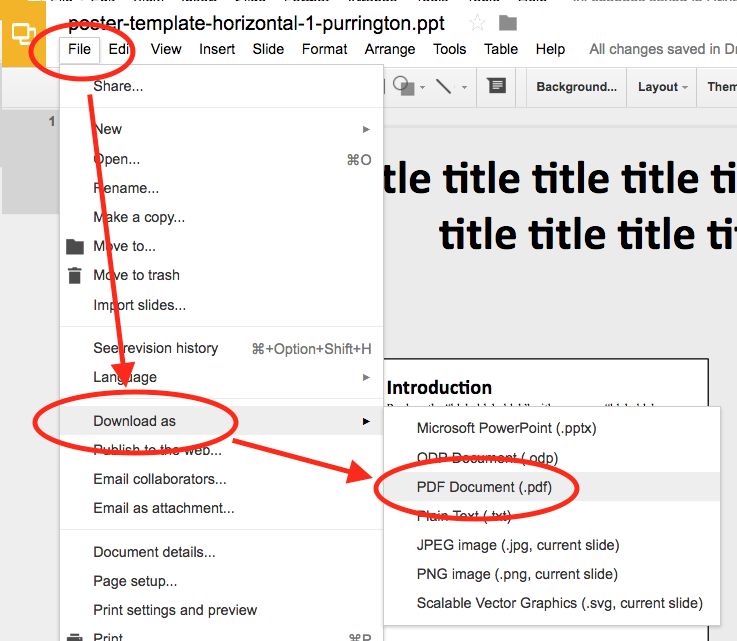
From the PowerPoint File menu, choose Save As..., change the file format to PDF, check the file name and the destination for the saved PDF, then hit the Save button. It’s as simple as that.
But . . . .
Be sure to check that the poster dimensions have survived the export to PDF. Open the PDF in a PDF reader, like the Preview app on the Mac or in Adobe Acrobat Reader, or any of a number of other PDF readers. Then, examine the file properties to see what the page dimensions are. They should be the same as what you set them to be in PowerPoint, that is, the dimensions of your printed poster. For example, on the Mac, in Preview, click the Tools menu, and then select Show Inspector:
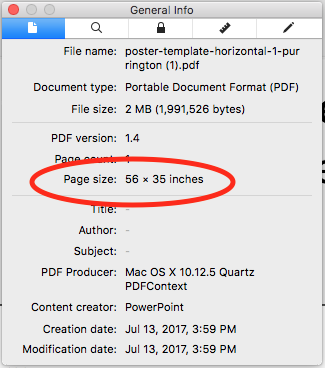
The Page size item should be exactly the same as the dimensions of your PowerPoint poster. In the above example I have exported the Purrington poster template to PDF from PowerPoint, and the dimensions do indeed match.
Most of the time, there is no problem with PDF export from PowerPoint. But if you have an old version of PowerPoint, the poster dimensions might not make it into the PDF file. In that case, the page dimensions in the PDF might be 7.5 by 10 inches, that is, the dimensions of the default screen presentation slide in PowerPoint. Sometimes this small slide size can be scaled up for printing, but you run the risk of things being out of alignment. So it’s always important to double-check that the PDF file contains the correct poster dimensions. It’s also a good idea to zoom the PDF out to 100% and check one more time that your fonts and graphics are all sharp and readable at full size.
Your PDF file can then be emailed to graphicarts@holycross.edu with your request for printing.
Other Software
Besides Microsoft PowerPoint, two other presentation applications are in common use for designing posters: LibreOffice Impress and Google Slides. Both work more or less similarly to Microsoft PowerPoint in terms of poster design, and each can create a PDF file for printing. You can import a Microsoft PowerPoint poster template into either LibreOffice Impress or Google Slides, and you can then export the poster to PDF format with the page dimensions intact for final printing.
LibreOffice Impress
Impress is part of the free LibreOffice open-source office suite. It runs on Mac, Windows, and Linux computers and can be downloaded here.
To set up an Impress file for poster design, you need to use the Slide menu:
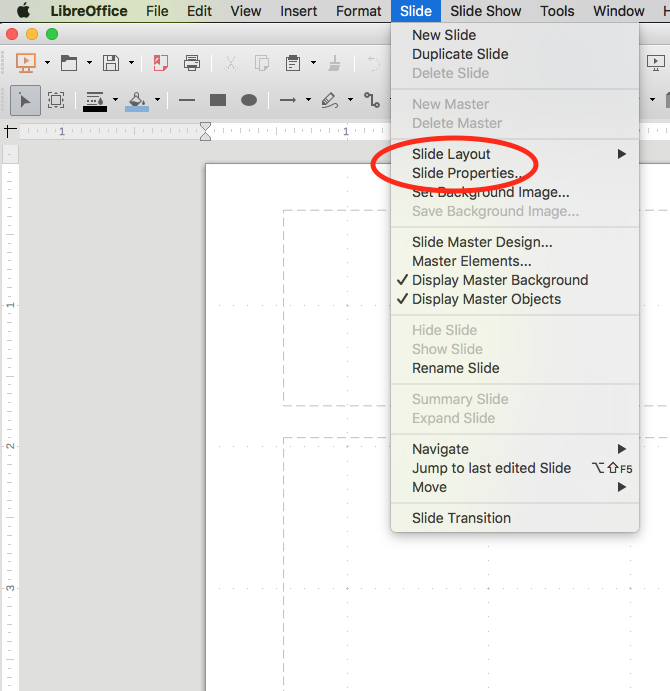
From the Slide menu, hover your mouse cursor over Slide Layout, and then select Blank. This will change the slide to a blank layout that you can use for your poster canvas.
Again from the Slide menu, click Slide Properties.... In the Page Setup dialog that appears, under Paper Format, change the Width and Height to match the dimensions of your poster. The Format will automatically change to User (equivalent to PowerPoint’s Custom) when you change the slide dimensions. Select your desired orientation (Portrait or Landscape), and then click OK. The dimensions of the poster canvas should then change to reflect your settings. You can confirm this by clicking the View menu and then turning on the rulers, which should show the correct dimensions of your poster.

Once you have set up Impress with the correct poster dimensions, you can use the Insert menu to access tools for inserting Image, Shape, and Text Box objects:
The Impress Format menu has tools for aligning and distributing objects on the poster canvas.
You can open a PowerPoint poster template directly in LibreOffice Impress and edit it as you would in Microsoft PowerPoint.
To save an Impress poster to a PDF file for printing, use the File menu. Choose Export as PDF..., click the Export button, choose a file name and destination, then click Save. Open the exported PDF in a viewer application to check that the poster dimensions are correct and that your poster checks out when viewed at full size.
Google Slides
Google Slides is part of the Google Apps collection that members of the Holy Cross community can access via their Gmail login. Google Slides has the same basic functionality for creating posters as does Microsoft PowerPoint. You can set up a custom poster canvas, insert text boxes, images, and shapes, and download the poster as a PDF file for printing.
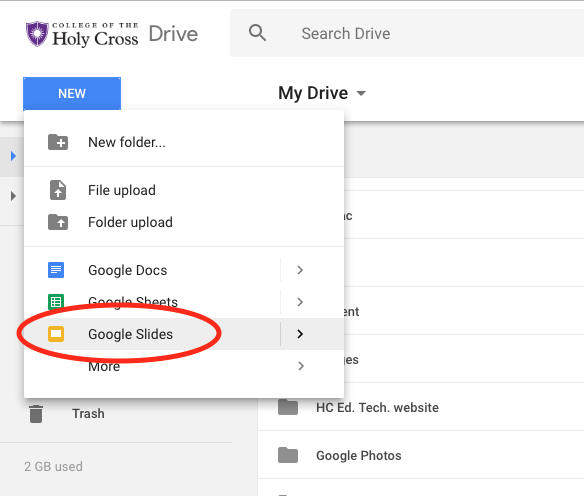
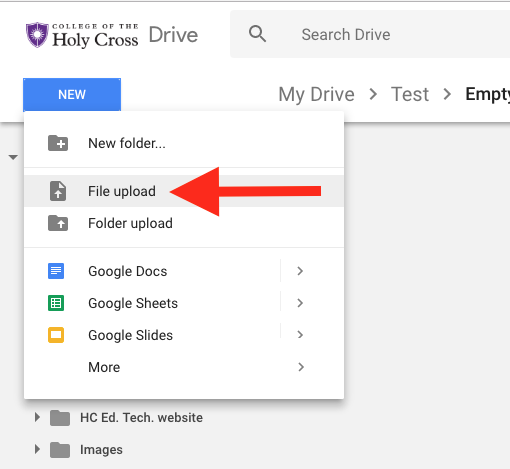
With Google Slides, your poster file is saved to your Google Drive account, and thus it is best to start Google Slides from inside of Google Drive. From Google Drive, click the New button, then select Google Slides:
What you will see next is something very reminiscent of Microsoft PowerPoint:

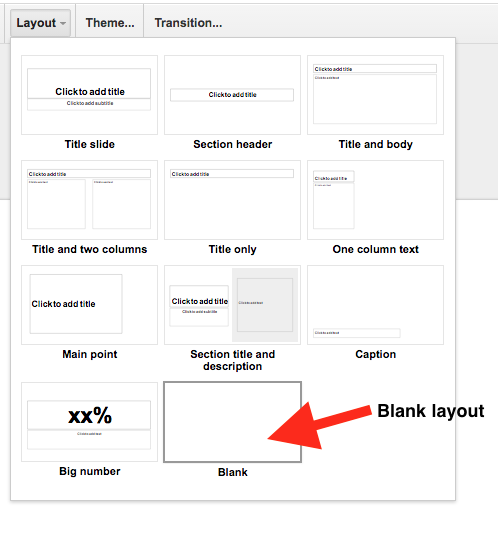
After dismissing the Themes menu and the speaker notes pane, click the Layout button and select a blank layout:
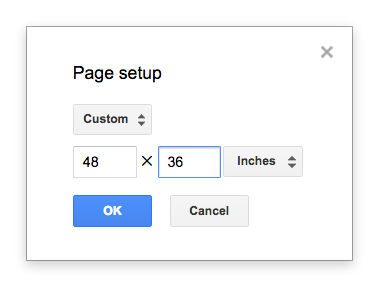
Next, click the File menu, select Page setup..., and just like in PowerPoint, choose a Custom slide and set the dimensions to be that of your poster:
Then, you can use the Insert menu to add text boxes, images, and shapes:

The Arrange menu has the usual array of tools for distributing and aligning objects on the poster canvas and in relation to one another.
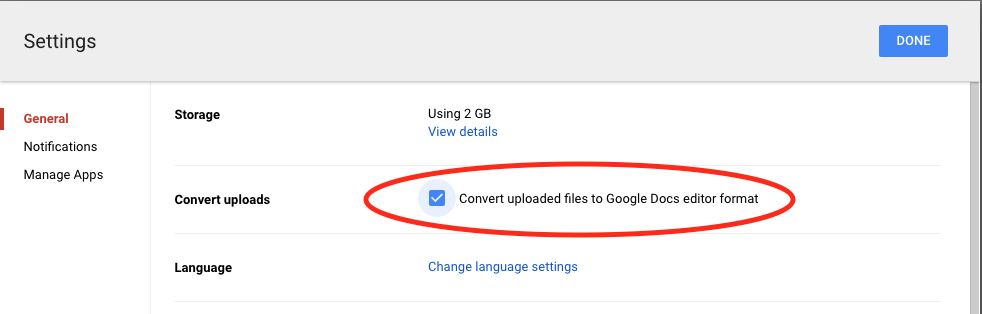
Using a Microsoft PowerPoint template in Google Slides is a little tricky. We have found that it is best to set up Google Drive so that it will automatically convert PowerPoint templates to Google Slides format when the PowerPoint template is uploaded to Google Drive. To do this, click the gear icon in Google Drive, and then choose Settings:

Then, in the Settings dialog, under Convert uploads, check the box to enable conversion of uploaded Microsoft Office files to Google format:
You can then upload a Microsoft PowerPoint poster template to Google Drive, and Drive will automatically convert it to Google Slides format:
Once the template is in Google Drive, double-click it and it will open in Google Slides, where you can edit it as usual.
When you have finished creating your poster in Google Slides, use the File menu to download it as a PDF file for printing:
To reiterate, it is wise to then open the PDF in a reader application and check to be sure that the poster dimensions are correct and that the poster looks correct when viewed at full size.
In Conclusion
There is one final, non-technological step that applies to all posters: Proofreading.
In addition to proofreading your poster yourself, it’s a good idea to have a colleague proofread it, because you have spent so much time creating the poster (not to mention doing the research) that typos and other errors could slip by.
After proofreading your poster, proofread it again.